BLog
HTML Tables — A Beginner's Guide (2024)
Explore the basics of HTML Tables—perfect for web developers and content creators, this guide demystifies the art of creating clean, accessible tables, offering essential tips and SEO insights.
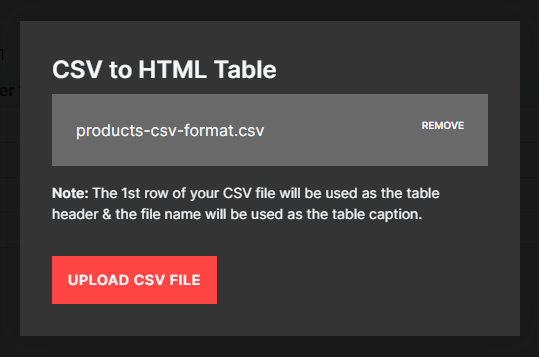
Note: The 1st row of your CSV file will be used as the table header & the file name will be used as the table caption.
Our best-in-class HTML Table Generator empowers you to effortlessly create responsive and accessible tables for your website—no coding skills required. This is the perfect tool for those looking to create tables on some of the most popular website builder platforms; Webflow, Squarespace, Wix, WordPress, you get the idea!
With our easy-to-use style panel, you can customize parameters, colors, sizes, and other CSS/HTML properties to generate code for a sematic, well-designed table.
Whether you need a simple or advanced table, or want to enhance the look with CSS to make it beautiful, our free online tool has you covered.
Creating tables for your website has never been easier. Follow these 4 simple steps to make the process seamless and efficient. Let's get started!
Begin by adding your data to the table. You can either manually input information into each cell (after specifying the desired number of rows and columns), or take advantage of our convenient "CSV to HTML Table" feature for a quicker setup if you have pre-existing data living in a spreadsheet, like Excel or Sheets.
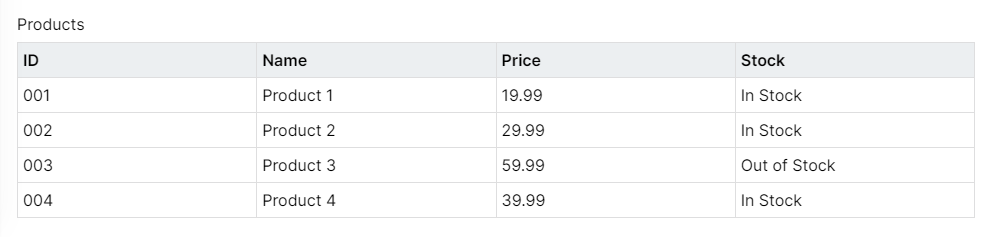
Tip: Be sure to add a unique caption for your table by replacing Table 1. In this case, we called it Products.
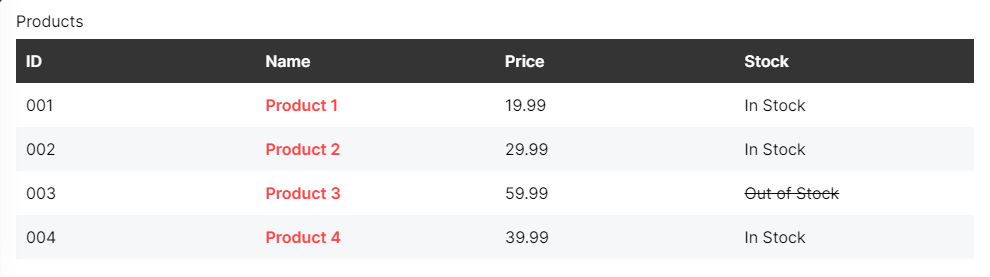
Once your data is in place, you can enhance your table with additional markup. Whether it's adding hyperlinks, emphasizing text with bold formatting, or incorporating strikethroughs, these elements not only improve user experience but also contribute to the semantic richness of your table.

Note:The additional markup added to your table will inherit the styles from your website. For example, the links will appear red on our website as they're inheriting the styles we have in place. However, once added to your website, they'll look like the rest of your website's links.
Now comes the fun part – styling! Ensure that your table seamlessly integrates with your website's design. In the style panel on the left, explore a variety of options to apply styles to the header, body, and individual cells. Tailor the appearance to match the overall aesthetic of your website.
If you'd like to generate your table without CSS, simply uncheck the "Generate CSS" checkbox.
Once you've fine-tuned your styles, simply click the copy button located above the code output. Paste the copied code into your project.

That's it! You've successfully created a semantic and responsive table that not only looks great but also enhances the user experience on your website. We'll save your table so when you come back, you can edit your existing one, or create a new one from scratch.
While our generator provides a range of styles, keep in mind that the possibilities are not limited to what we offer. The code output empowers you to effortlessly customize and refine styles, allowing you to achieve the ideal table for your website. In the near future, we plan to add even more features (like colspan and rowspan, to name a few).
Looking to dive in deeper? Learn how to make an HTML Table in our comprehensive guide.


Updates, best practices, tips, and tricks—straight to your inbox. No spam, we promise.